
Is your kitchen looking a little blah lately? Installing custom cabinet hardware is an easy, relatively inexpensive way to add style and personality to an uninspired kitchen. Hardware installation is a great project for beginners and DIYers. It only takes an hour or so of your time, and requires just seven basic tools to install.
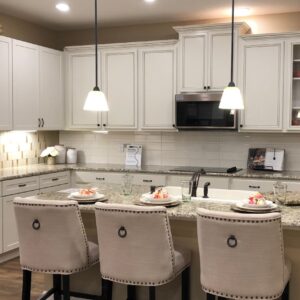
If you’ve been following our adventures for a while, you know that my husband and I recently bought our very first house, a new construction from KB Home. Over the past year or so, we’ve slowly put our stamp on things with paint and décor, and we have several small home projects in the works for 2021. One of my favorite projects thus far was installing our own cabinet hardware in the kitchen. We chose simple, elegant brass cabinet pulls in two lengths (linked below), and installed them ourselves using a handful of basic tools.
Today I’m sharing a simple, stress-free guide to installing your own cabinet hardware, with a bonus look at how we took our builder-grade kitchen from basic to bold. If you’re in the market for a new construction home and wondering if you should install your own hardware or let the builder do it for you, this post will be especially useful.
This site contains affiliate links to products. We may receive a commission for purchases made through these links.
Tools Needed for This Project

This project requires just seven basic tools, most of which you probably already have at home! I linked each item in the list below for easy shopping, just in case you do need any supplies. You will need:
- Cabinet & Drawer Templates: you could do this project without a template, but using one helps to ensure that your hardware is evenly and equally spaced on each individual cabinet. Using a template is the beginner’s key to achieving a clean, uniform look in your kitchen. The template kit linked here comes with a fresh bit that suits standard hardware screws perfectly, eliminating the need to guess which size bit works best for your project.
- Level: for ensuring the template is straight and level, especially if you find the template does not line up exactly where you wanted to install your cabinet hardware. More on that in a minute.
- Measuring Tape: for measuring the height and length of your cabinets and finding the middle point on which to center the template. I used a regular clothes measuring tape here, but a metal measuring tape is ideal for ultra-precise measurements.
- Pencil: for marking the spots where you want to drill holes
- Painter’s Tape: for minimizing the drill damage to the backside of the cabinets. I used Frog Tape because that’s what we had on hand, but any painter’s tape will do.
- Power Drill: for drilling holes into the cabinets
- Phillips Screwdriver: for attaching the cabinet pulls
Hardware Used in Our Kitchen
- Franklin Brass Champagne Bronze Cabinet Pull, 3-3/4″: used on short bottom cabinets, narrow drawers, and the square cabinets above the fridge and microwave
- Franklin Brass Champagne Bronze 5-1/16 Inch Cabinet Pull: used on tall upper cabinets and wide drawers
- Longer screws: used to attach hardware to drawers when the included hardware was not long enough. Check the screw size included with your hardware (generally found in the product description online), and buy a longer version of that at the hardware store.

7 Simple Steps to Installing Your Own Cabinet Hardware
1 – Measure, and Measure Again

This is the most important step in the whole process, especially if you’re installing drawer hardware. Drawer pulls typically look best in the dead center of a standard drawer. If your drawers are tall, hardware is typically centered at the top of the drawer for better leverage. To find the center point, measure the front of your drawer for both height and width and mark the middle with a pencil. Measure again and double check your work. It’s worth measuring twice now to avoid drilling in the wrong place later.
If you are using a cabinet template, then you probably won’t need to measure your cabinet fronts. When used correctly, the template will place all knobs or handles in the same location on every cabinet front.
2 – Find Your Center (Prepare the Templates)
If you’re using single-screw cabinet knobs, feel free to skip ahead, as this step does not apply. If you’re using cabinet pulls, however, knowing the length (in inches or in millimeters) between the two screw holes is key to the installation process. This measurement is called the “center-to-center” distance, and it can be found in the product description or by manually measuring the length between holes with a tape measure. A few standard lengths, for reference, are 3 inches, 3 3/4 inches, and 5 1/16 inches.
Once you know your center-to-center distance, find the corresponding length on your cabinet and drawer templates. Keep in mind it may be marked on the template in millimeters instead of inches.
3 – Mark the Places You Want to Drill

To avoid confusion later, it is helpful to cover all the other holes in the template with tape, leaving only the ones you plan to use exposed. If you’re using single-screw hardware, use any hole you like. If you’re using hardware with two screws, refer to the center-to-center measurement on your template, and use that to easily mark spots for the top and bottom screws. Just keep it consistent, and use the same spot(s) on the template to mark every surface.
Place the template on the drawer or cabinet, making sure the edges are flush and the template is level and centered. Then, simply take a pencil and fill in the exposed hole(s) in the template. Trace around the edges of the hole, leaving a neat circular outline on the surface to be drilled. Do a test run on one cabinet and one drawer and hold your hardware up to make sure you like the placement before drilling or marking any of the other cabinets and drawers. Take time to play around with the positioning if you don’t like how it looks on the first try. Use a pencil so you can erase marks as needed.
Template Hack
The corner edges on the cabinet template keep everything consistent and level, with every screw landing in the exact same place on each cabinet. Unfortunately, these edges also prevent you from sliding the template up or to the side. If you have hardware with two screws, and you don’t like where the template places the two screw holes by default.
If you don’t like where the cabinet template places the start and end points, and you want to move them up or to the side, here’s how you can hack the templates and make it work.
- Find the correct center to center distance on your template. The length should be marked, as seen in the photo above. Cover the excess holes with tape, or just circle the holes with Sharpie so they are easy to identify.
- Now, place the drawer template on top of the cabinet template, with the top edge turned sideways to grip the outside of the cabinet door, and find two points that line up with the exposed holes on the cabinet template. Mark these holes, and use tape to cover all the other holes in the template. The goal is to replicate the center-to-center distance, but on a template that can be moved up and down to your preferred spot on the cabinet. See where I’m going with this?
- Now that you have your center to center marked and taped off on the drawer template, you can remove the tape from the cabinet template. Hold the cabinet template up to the corner of the cabinet as usual, and figure out where you want to place the bottom screw of your hardware. Use any hole you like to carefully mark the spot, and don’t worry about the center-to-center distance for now. Make sure to mark which hole in the cabinet template you use, and keep it consistent across all the cabinets.
- Now, use the taped-up drawer template to mark the top screw hole. Simply line the template up so the bottom exposed hole lines up with the pencil mark you just made. Use a level if desired to be absolutely sure that the template is straight and level, then pencil in the upper exposed hole. It helps to have someone hold the template in place while you level and mark the cabinet. Voila! You’ve hacked your templates to achieve the correct center-to-center distance, in a custom spot that works for you!
4 – Protect Your Cabinets
One last step before you break out the power tools: place a piece of painter’s tape securely over the inside of the cabinet or drawer, directly behind the place where you intend to drill. The tape will help to minimize any splintering the drill bit might cause while breaking through the back of the cabinet.
Check to make sure that you’re not about to drill into the cabinet frame. Drill with the door open if needed, and feel free to lay down some paper towels or another protective covering to help catch any sawdust. If you’re drilling above your microwave, be sure to cover that as well to keep dust and debris out of the filter.
5 – Drill Screw Holes

Now the fun begins! Measuring and marking the cabinet holes can be tedious and time-consuming, but actually installing the cabinet hardware is a super fast and easy process. To drill holes into the cabinet, I recommend first drilling a small pilot hole, using a bit much smaller than your hardware screws. Apply a little pressure to help “bite” into the very center of the penciled circle, then keep the drill level while drilling through the front of the cabinet.
Now, enlarge the hole by drilling a second time, using the bit included in your cabinet template set. The smaller pilot hole helps the larger drill bit to glide through the cabinet on a preset path, and it also gives you a little bit of wiggle room to adjust if you notice the pilot hole is slightly off center.
6 – Clean Up

You did it! The scary part is over! All that remains is for you to clean up and attach your beautiful new cabinet hardware! Slowly remove the tape from inside the cabinets, then use a cloth or vacuum to clean up any sawdust. I poked a cabinet screw through each hole to clear any remaining debris before cleaning up.
7 – Attach Cabinet Hardware
It’s time! To install your cabinet hardware, simply line the knob or pull up to the hole you just drilled, and thread the included screws through the back of the drawer or cabinet to fix them securely in place. If you’re drilling through drawers, you may find that the screws included with your hardware are not long enough to fasten into the hardware. No worries! You can buy longer ones at the hardware store.
That’s it! Installing cabinet hardware is surprisingly easy once you know what to do. It’s a fun and satisfying project with major visual impact. There’s just one thing left for you to do: sit back and enjoy your beautiful, updated kitchen!

Our custom cabinet hardware makes a huge difference in the overall style and function of our living space. It keeps our white cabinets fingerprint-free, and the doors are easy to open with just a pinky if my hands are already full. Our kitchen makeover is far from over, of course! Next we’ll add specialty lighting over the island, dress up the window, and add some cabinet molding. If we stay in the house long enough to swap in granite counters, we will also add some fun tile backsplash on the back wall.
For those looking to update their kitchen, or who, like me, just don’t like the hardware options available through their builder, this is a great way to dress your space up without spending thousands of dollars on a full kitchen renovation. The hardware and templates for this project cost just under $100, and I was able to complete it using basic tools I already had on hand. I hope this post will help you to find the courage to update your own kitchen. Please share in the comments and let me know how it goes!
More New Construction Tips
- The Buyer’s Guide to the KB Home Design Center
- Buying a New Construction Home: 7 Keys to Enjoying the Build
- 7 Surprising Drawbacks of Buying a New Construction Home
Save this Post


Hi! What cabinets did you purchase? We are doing a new build with KB and stuck between a few options, but I like the look of yours!
Our cabinets are Derby Birch in the color Cotton. I believe they are 36″ tall, which was the tallest we could get with the slant of the volume ceiling.